Showing posts with label mistakes. Show all posts

Tuesday, April 24, 2012

weekly challenge #67: 'amanda' (earth) day

I don't currently have anyone in my life named Amanda, but if a child (most especially the Diva's child) declares that the earth must be referred to as 'Amanda' (even if he doesn't know one either)... well...

Happy Amanda week!

I'm posting two tiles for earth day: one that I like and one I don't. I'm striving to be more diva-like; it resonated with me when she said tangling is 'more about the process than the product' for her. And drawing a feathery egg was... uh... quite a process. I think I'm gonna need to spend a little more time getting acquainted with the Featherfall pattern before we can really get along.

The second tile I did a while back, but if you wanted it any earthier, you'd have to rub it in the dirt.


Thursday, April 19, 2012

VEEZLEY


Hey, funseekers, here's the noob of the day: Meet VEEZLEY.


A word of advice before we get rolling:

Using graph paper for a pattern like this is like missing laundry day and having to wear a bra that's too tight. Honestly. There is no zen to be had there.... don't do it.

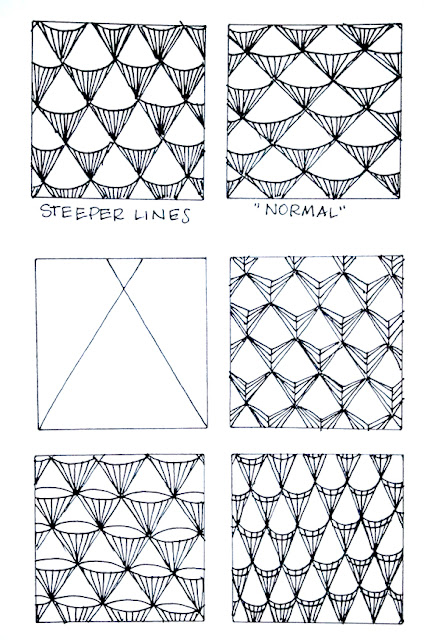
Just draw some parallel diagonal lines, and then do some going in the opposite direction. It doesn't have to be perfect. Perfect is boring. Shoot for halfway between perfect and interesting. 

Yeah, I wouldn't listen to me, either. 

Here's an old cookie decorating trick that will help you draw a decent grid: 

Decide how big a slant you want on your first set of diagonal lines and draw one right smack in the middle of the space you want to fill. Then do the same for the lines going in the opposite direction, so you have an X in the middle of your section (like the first square). You will find that it's easier to keep your lines roughly parallel and more equally spaced if you start in the middle and work outward than if you work from one side to the other. Cookies don't lie. At least mine didn't. I still think the store-bought variety are of questionable integrity.


Next, turn your tile 90 degrees and draw a nice swoopy line through each diamond. Make sure you go from one point to the next, drawing sloooowllllyyy. It seems to work better if you draw each 'swoop' individually and don't try to make it one long wavy line. 


Then draw a vertical line straight down from the center of each curved line, to the point directly below it. 


Here's some stuff you can do with it. Not only did I skip the shading, I'm pretty sure I just plumb forgot to keep drawing when it came to square #3. Sorry 'bout that.


Filling in the negative space in between gives this pattern some punch. This looks better with a slightly bigger grid so you get some white space in between your lines for contrast.


...and a few more variations...


Ha... look what I found in an old photo folder! See??


Friday, April 13, 2012

SNIRCLES


I've been playing with a new pattern. Meet SNIRCLES. 
Named so, because they are drawn in a snircular shape. Obviously.

This pattern requires a little bit of concentration. It's not difficult to draw, but you have to pay attention. Just remember north, south, east, east, north, west, south, north, west, east, west, and you'll be fine.

Just kidding.


Some ideas and variations I ran with while working through the steps.


Some tips for successful 'snircling':
For maximum zen, draw all of your outer circles at once. Then all of the auras (step 2), then all of the inner auras (step 3), then all the 'tails' (step 4). It's easier to keep track of which lines are going in what direction that way.

When drawing the initial circles, go slowly and make a complete circle every time. Don't stop your line because you bumped into another circle because they will look more misshapen that way. A little bit of overlap is ok.

If you curve your tails rather than keeping them straight, your spheres will look more dimensional, which can be further enhanced by shading later on.

Keep your snircles small, or they'll run rampant. Just like children, the bigger they are, the harder they are to wrangle. ;o) And there's nothing worse than an errant snircle!


As you can see, the direction they face can make a big difference in the way your full pattern looks.


 inward-facing


side-facing


random (only 50% zen, requires some decision-making while you draw)


same one, only stringier.


I know that non-representational art is the whole point of Zentangle... but if it wasn't, wouldn't these little tulips look cute tucked into a tangle?? I couldn't help myself. Let's blame the fourteen years I spent decorating cookies for a living.

The red pen is quickly becoming the bane of my blogosphere existence. I swear, I try to remember to use it, but by step two or three I forget and have to start all over. Or I draw the wrong step in the wrong color. It is BUSTING MY GROOVE. See the basic steps I drew up, at the beginning of this post? I hope you like them, 'cause it took three tries to get the right parts in the right colors!

My theme song for this next attempt will be a really catchy song by The Afters, appropriately titled 'Start Over'. ;o)

*seven index cards later*

Sooo... sorry about the lack of red ink here, but here are the steps for the fancy border. 


I love this one. How could you not, when it looks like a breakdancing caterpillar? There's so much room for variation with this pattern. Look at the difference in the two borders at the bottom, just from changing the direction of the snircles.


...and there's so much potential in the SHADING.


That's it for now... thanks for reading! As always, I'm open to suggestions for improving the process. 


Monday, April 09, 2012

SNAFOOZLE

It's so true that the more I tangle, the more I see the potential in patterns all around me. I catch myself mentally deconstructing them (whether I want to or not) to figure out if they can be broken down into simple steps without too much effort. That's the trademark of a good tangle pattern. If it's a nonrepresentational pattern- and it can be repeated easily and consistently in a limited number of steps- it's a winner.

I'm calling this pattern SNAFOOZLE because it ought to have a name, but you will notice it's got strong notes of Munchin and a fruity Tripoli finish. ;o)

Here's the original pattern that inspired me (and thanks to my mom, who gave me the box!):


And here's the breakdown:


Sorry, I fell off the red marker wagon almost immediately. It's still pretty easy to figure out the steps, though. Just make sure your first set of loops resembles a triangle with one slightly rounded side and run with it.

For those who like a tighter, neater pattern, I tried a version of Snafoozle within a Tripoli framework. And I have shamelessly erased my pencil lines. 

I'm very sorry about that.


This seems like a good pattern to put within other patterns. Or color in... or make ZIA flowers out of... or add PERFS!


This is what I mean about never knowing when to quit. White space? Not for long! I'm actually considering drawing betweed on every white petal shape.


I did warn you.


If you try this pattern, please show me. And if you think of an easier way to deconstruct the original pattern, show me that too.


One more thing...


...and a few variations to go with it. 
Inverted, 'cause I can.


Have a nice week. With no tornadoes.


••••••••••••••••••••••••


UPDATE: The SNAFOOZLE CHEAT SHEET: Using Tripoli as a template.

Well... at least we know I named it appropriately. :o)

sna·fu
[sna-foo, snaf-oo]
noun: A badly confused or ridiculously muddled situation.
Synonyms: snarl, bedlam, tumult, disarray, disorder, confusion, mess; foul-up.


Some thoughts on detangling Snafoozle, if the first explanation doesn't jive with you: 

-It really does help to keep Tripoli in mind when you're drawing this pattern, because the shapes fit together similarly (Think of each cluster of loops as one shape). 

-You can always add a loop if you need to define your triangle shape a little better. 

-As a training/practice exercise, try drawing Tripoli lightly in pencil (slightly oversized) on a sheet of paper and practice fitting your loops within the triangles of Tripoli to get a feel for the way they fit within that shape. 

-Keep in mind that the points of the loops loosely converge, not in a corner or on one side, but somewhere in between. 

-Also, just like Tripoli, once you get a few rows out, you might have to split some spaces into two sections instead of one to keep your loops from getting too big. Too big means looser loops and less control, and then it gets harder to figure out where things are supposed to go.

-If you get some gaps between your loop clusters, take advantage of that and draw an aura in them. It makes gaps less obvious, and it still looks pretty. Honest.


Thursday, March 08, 2012

CADENT


Cadent study with watercolor. This is a good example of why we use ink instead of pencil... if I had been able to fix my mistake, I never would have discovered the variation on the upper right. Which I love.